Microcontrollers, Mathematics and a Merry Christmas
Prelude
We decided to put up some lights around the house for this year’s Christmas. As is my curse, I decided to whip up some fancy rainbow animations using a bunch of WS2811 LEDs and a NodeMCU that I had lying around. (see: LeapRGB)
What’s unique about these LEDs is that each one contains an IC; as such, it allows you to individually control each LED in the strip. A typical LED strip might have a power and a ground line and have the entire strip light up uniformly. Here, we have a power, ground and a data line that can be fed using a microcontroller.
This is the design that we decided to go with.
: : : : : : : : : : : :
| | | | | | | | | | | |
| | | | | 7 7 | | | | |
| | | | 9     9 | | | |   => two strips of 72 leds => 144 leds
| | | 11       11 | | |
| | 13           13 | |
| 15               15 |
17                   17
As a big fan of symmetry (and in the pursuit of laziness), I decided that both halves of this design should be mirrored. This would allow me to feed the same input to both strips.
Building It
The way I would be wiring it was still unclear when I started working. I split the code into a few layers of abstraction so that I could fill in the bottom-most layer at the very end after the wiring was done.
- Display Layer: consists of methods to map coordinates to the corresponding LED index on the strip, and getters and setters for each LED.
- Sequence Layer: a base
Sequenceclass with virtual methodssetNextFrame()andinit(). Any animation sequence would inherit from this class and implement these methods. - Main Layer: declares all the sequences and calls the respective methods to set the next frame and push it to the LED strip at appropriate delays.
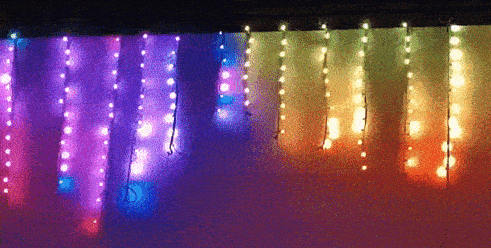
There are two digressions I would like to go on here. But, before I get into that, I need to re-capture your attention with some flashing lights. So, here’s how it finally turned out.
I will get to the glaring issues later. Getting into the digressions,
Math
The need for math in computer science is often questioned (outside math-heavy realms like ML and whatnot). I’m of the opinion that you can find what you need (with the almighty power of the Internet) when you need it, but random stuff I learnt in school still finds relevance in my day-to-day projects. For this specific project, I was writing a function to map from a coordinate to the corresponding LED number on the strip.
A single strip is as follows.
      0 1 2 3 4 5
                ╔═════ Power + Data In
      ▲ ╔═╗ ╔═╗ ▼
   0  │ │ │ │ │ │
   ┊  ┊ ┊ ┊ ┊ ┊ ┊
   6  │ │ │ │ │ │
   8  ║ │ │ │ │ │
  10  ╚═╝ │ │ │ │
  12      ║ │ │ │
  14      ╚═╝ │ │
  16          ║ │
              ╚═╝
Here, we have 6 lines labelled 0-5. The leftmost line contains 7 lights, and the rightmost line 17. In general, the ith line contains 7 + 2i lights on it. You might’ve noticed that this is an arithmetic progression. And that realisation is what’s going to come in handy later.
For an arithmetic progression with common difference d and first term a, we have the following formula for the nth term.
Since we’re moving right to left, we can see that we have a = 17 and d = -2.
What we’re trying to do is map a (line, element) pair to the appropriate index on the strip. For example, (5,0) would be 0 and (0, 0) would be 71. So, what’s the approach we’re taking here?
The direction of the lines alternates back and forth. On an odd-numbered line, we would move top-down, and the opposite on an even-numbered line. The general approach we need is to find the total number of lights up to the previous line and then add/subtract the number of lights corresponding to the current line. Let (line, element) be the coordinate we’re trying to resolve.
up till the previous line
Since we have the realisation that this is an arithmetic progression, we have a ready-to-go formula we can apply to get the sum of terms.
Since our line index is opposite to the direction of the progression, we calculate
nas5-line.current line
elementgives us the offset from the top of the line. If this is a top-down line, we can just addelementto the previously obtained sum to get the index. Otherwise, we can calculate the offset from the bottom by subtractingelementfrom the total number of lights on the line.
Putting this together, we have the following function.
int coordToLedIndex(int line, int element){
  // total lights until the previous line. (using our sum formula)
  int lineOffset = (5-line)*(13+line);

  int elementOffset;  // the offset on the strip for this line.

  if(line %2 == 0){ // even lines are bottom-up.
    int lineLength = 7 + line*2;  // total length of the line
    elementOffset = lineLength - 1 - element;

  } else { // odd lines are top-down.
    elementOffset = element;
  }

  return lineOffset + elementOffset;
}
Now, I know arithmetic progressions aren’t awfully complex. I’m sure you could devise the logic for this with a minute of pondering. But my point still stands. There have been many occasions where the math I’ve learnt has come in handy simplifying the code I’m writing. (of course, I didn’t have a void to scream into then; good thing I have this blog now). Eitherway, this whole math section here is just an excuse for me to mess around with KaTeX, so take what I say with a grain of salt.
Code Organisation
Trying to follow the layer structure above, I wanted to split my program into multiple files and include it all in a main.ino, but that is not how the Arduino IDE expects you to organize code. If the folder is called MerryChristmas, then we would have a MerryChristmas.ino, which is the file that will be uploaded. If you want more files, we would have something like
MerryChristmas
├── MerryChristmas.ino
├── 10_Display.ino
├── 20_Sequence.ino
├── 30_Sequences.ino
└── 40_main.ino
Each file other than MerryChristmas.ino will be sorted in alphabetical order, placed together and uploaded as a singular file with MerryChristmas.ino first. This is awful. The Arduino IDE, in my opinion, feels very amateurish and, until recently, did not even have a dark mode (in this day and age, high treason). Not to mention the clutter that it adds to the home directory. Obviously, it’s not built for the most technical audience and definitely does not need to worry about anything I’ve mentioned here.
I tried to set it up with VSCode, but it felt like a whole hassle to get that working, and it does not even work properly if I don’t have the IDE installed. There is an alternative in the form of the arduino-cli though, which is always promising.
I did stumble on some even cooler alternatives which I’ve mentioned later.
Issues
At the beginning of this post, I’d mentioned symmetry, mirroring, and whatnot. If you take one good look at the GIF/GIF above, you’ll see that there’s none of it.
My personal deduction is that this must be because of attenuation along the line. The controller is placed at the rightmost end, and the lines are fed from the top of the 17 LED lines. So, there’s a wire that goes across the entire setup carrying the data from the controller to the beginning of the left strip. The data must be getting distorted, or some other hijinks with the wire must be afoot.
Either way, it didn’t look too bad. So, as they say,
it’s not a bug; it’s a feature
I should’ve considered the possibility of treating the entire setup as a single strip of 144 LEDs, which might not have had this issue. The whole point of splitting it was to ensure everything was shining with maximum brightness. Oh well.
Notes for the future
I happened to stumble upon this YouTube video the other day (really cool channel btw. would recommend.). The essence of the video is the usage of Rust to write a program that compiles down using the avr-gcc linker and can be run on the AVR processor of the Arduino.
He talks about the usage of Hardware Abstraction Layers to access the peripherals and pins of the Arduino. I found it quite interesting being able to flash such low-level code to the Arduino. There are similar HALs for the Raspberry Pi too, which allows you to write the bootloader even. Really cool.
Rust, being the cult that it is, has always been something I’ve wanted to work with. Maybe this will finally give me a reason to mess around with it. Keep a lookout on the projects page to see if I made it (fingers crossed).